It has become a tradition that my eldest son makes a little something for his Daddy for special occasions (with Mommy's help of course ;))...Since my youngest is only 4 1/2 months old I thought a card with handprints of both boys would be cute. The process was quick but neither liked it very much! I used Crayola finger paint that I already had so it was easily washed off.
Initially I was annoyed that my eldest got fingerprints on the front of the card but now I think it's cute and makes it even more authentic:). Daddy was very proud and happy with his Valentine's card from his boys!
Let us inspire you to find the perfect gift for that special person! All ages, all budgets, all occasions! We're two good friends who love the thrill of finding those unique and great gifts for the people in our lives.
Showing posts with label DIY gift. Show all posts
Saturday, 15 February 2014
Valentine's card for Daddy!
Tuesday, 10 December 2013
My latest fabulous & free find!
I'm finally getting around to decorating our newly painted and therefore, very naked walls...I've had some pieces ready to go up for some time now but there are still some spaces left to fill...Enter The Handmade Home's free download and I could not be happier as there's a perfect spot in our "nursery nook" for these. Just download here, print on quality/thick paper and hang with mini clothe pins on the wall. A-d-o-r-a-b-l-e!
They also have numbers!
Follow Yolanda's advice from her latest post and package these in colourful tissue in a pretty box, add a bow and you've got yourself a sweet and very inexpensive gift!
![]() |
| Free printable via The Handmade Home |
![]() |
| Free printable via The Handmade Home |
They also have numbers!
![]() |
| Free printable via The Handmade Home |
Follow Yolanda's advice from her latest post and package these in colourful tissue in a pretty box, add a bow and you've got yourself a sweet and very inexpensive gift!
Labels:
Baby shower gift,
DIY gift,
Gift for baby,
Nursery Room
Friday, 6 December 2013
DIY Paper air balloon mobile
I wanted to create something special to place over the change table to keep baby busy while being changed. I came upon quite a few mobile ideas on Pinterest and chose to make something myself. I had been into air balloons, elephants and stars while planning for this baby and so air balloons it was!
There are so many tutorials online...You can follow this one from Simply Frugal. I followed a few and worked with a free air balloon template I found using Google. I used paper from a pad of cute scrapbook pages in various prints (something like this) and some wood dowels in the craft aisle at Walmart and voila! Not sure how long a paper product will last in our house but it's definitely a cute inexpensive addition to the space.
I used a small clear 3M Command hook to hang the mobile from the ceiling. I love these as they can easily be removed without any damage to your walls. Amazing!
This would make a sweet gift to give at a baby shower or to gift over the holidays.
| My DIY air balloon mobile |
There are so many tutorials online...You can follow this one from Simply Frugal. I followed a few and worked with a free air balloon template I found using Google. I used paper from a pad of cute scrapbook pages in various prints (something like this) and some wood dowels in the craft aisle at Walmart and voila! Not sure how long a paper product will last in our house but it's definitely a cute inexpensive addition to the space.
I used a small clear 3M Command hook to hang the mobile from the ceiling. I love these as they can easily be removed without any damage to your walls. Amazing!
![]() |
| 3M Command Hooks via Walmart |
This would make a sweet gift to give at a baby shower or to gift over the holidays.
Labels:
Baby shower gift,
DIY gift,
Gift for baby,
Nursery Room
Tuesday, 3 December 2013
DIY Dinosaur tails and dino party!
My beautiful boy turned 3 and a dino party it had to be!
We kept it small at his daycare but he had a lot of fun! I made the dino tails I mentioned in a previous post and they were a definite hit! You can find the tutorial by Jessica from the Running with Scissors blog here.
The kids each put on their dino tail and we proceeded to have a little dino dance party! Love that my hubby got it on video for him to see when he gets older!
I also made the kids dino cupcakes and dino treat bags but of course forgot to take pics of both...
Simple and sweet!
These dinosaur tails would make a great Christmas gift for any young child! The parents of the other children at the daycare thought I bought them! Everyone will be surprised when you tell them you made it yourself!
We kept it small at his daycare but he had a lot of fun! I made the dino tails I mentioned in a previous post and they were a definite hit! You can find the tutorial by Jessica from the Running with Scissors blog here.
| My DIY dino tails |
The kids each put on their dino tail and we proceeded to have a little dino dance party! Love that my hubby got it on video for him to see when he gets older!
| Ready for a dino party! |
| Every day fun with his dino tail! |
I also made the kids dino cupcakes and dino treat bags but of course forgot to take pics of both...
Simple and sweet!
These dinosaur tails would make a great Christmas gift for any young child! The parents of the other children at the daycare thought I bought them! Everyone will be surprised when you tell them you made it yourself!
Monday, 2 December 2013
DIY dog bed cover!
Our dog beds are getting old and used up...I shopped around online and found modern dog beds that actually match our decor but are a little pricey for my liking. Then I saw this pic below and thought I can do that! It's pretty much just a pair of extra big pillows!
I had a few minutes Saturday afternoon while my husband and eldest were out and baby was sleeping...I whipped out some grey fabric that I had been hoarding for a while :)...perfect for a dog bed as the weave is very tight which makes for a nice durable and pet-friendly fabric!
![]() |
| Dog bed inspiration pic via it's my visual life! |
I had a few minutes Saturday afternoon while my husband and eldest were out and baby was sleeping...I whipped out some grey fabric that I had been hoarding for a while :)...perfect for a dog bed as the weave is very tight which makes for a nice durable and pet-friendly fabric!
It literally took me less than 10 minutes per bed cover! I just made a very simple giant envelope type pillow case. Follow this tutorial if need be and just adjust to dimensions wanted for dog bed. Mine was approx. 3ft by 2.5ft.
![]() |
| Easy pillow case tutorial via Decorating Vacation Property for Profit |
Last but not least I just stuffed them with the old dog beds! Not bad for 20 minutes of my day and no $$$!
The beds fit perfectly on either side of the sideboard. Now onto the next item on my list...finding an extra large (affordable) mirror to go over our sideboard...
This DIY would be so easy and inexpensive to do in a fun print or plushy fabric to revamp an old pet bed as a Christmas gift for your favourite furry friend!
Friday, 19 July 2013
DIY Teepee!
As I mentioned last week, I really wanted to get my son a play teepee this summer but found the options (here and here) a little expensive (especially so when you add the shipping and duties from the US!)...and so I thought I can sew, why not try! I found many tutorials online but as previously mentioned this is the one I followed. I definitely tweaked a few things along the way but it was a good base to work from.
![]() |
| DIY Teepee tutorial via My Poppet |
I got the striped fabric from IKEA, you can find it here in orange/white, blue/white, red/white and green/white stripe. I was pleasantly surprised as it really replicated the same look as the Land of the Nod one I wanted. I added up all the components I used to make this teepee and it added up to just under $50. I think that's a pretty good deal! Also, this is very easy to store as it retracts into itself when it's time to put it away.
Drum roll please! :) Here it is...apologies for the bad Iphone pic...
Now I just need to make some kind of massive pillow to make it a little cozier in there and maybe a string of lights to add some whimsy!
![]() |
| Massive cushion inspiration via BananaJ Creations |
![]() |
| String of lights for a little whimsy! via Tumblr |
If you have basic sewing skills and access to a sewing machine I definitely recommend giving it a try!!
Monday, 8 July 2013
Guilty guilty guilty but busy busy busy!
So I'm feeling a little very guilty seeing as I have not been giving GiftLOVE any love this past while...The truth is I keep adding projects to my to do list while I'm barely chiseling at the existing mountain of "to do" items I want to do before the baby comes...I have completed a few and am part way through a few more...
I thought if I shared my intentions with the "cyber universe" I'd be more likely to hold myself accountable...so here goes, my short list (items I absolutely want to do before the baby comes from my long aka never ending to do list):
1) Build my son a teepee. Done. Will share pics of the final product this week. Check out inspiration here and here and here as well as the tutorial I followed here.
2) Find items for the new baby that will fit in the "nook" in our bedroom that he will be sharing with us for the first few months (before joining his big brother in a shared bedroom). Will share challenges of having a second baby in a 2 bedroom home (It's really a 3 bedroom but the hubby works out of the third as a home office full time)...the products that I am soooo glad I found (this compact crib especially!) and finally hopefully in the next month, photos of the finished nursery-nook.
3) Redecorate my son's nursery to make him a special big boy's room before the baby comes...Again, will share all the fun (and practical) items I found to redecorate on a budget!
4) Finally pick the paint colours and backsplash to refresh our kitchen and home this coming month. Have you ever looked for the perfect grey??? I've found that I'm not the only one feeling a little overwhelmed over what grey to use. Check out these helpful articles here, here and here.
5) I have many DIY's I'm currently working on. I'm currently making my version of this, this and/or this, and this and hope to try to make this, this and one or two of these! Will update as I complete projects...These are all to decorate my son's rooms or our living space but can all be made to gift to a loved one!
6) As for gift giving in the immediate future, I need to find a small gift for my brother and his wife's first wedding anniversary, a birthday gift for my godson's 3rd birthday, a housewarming gift for my brother-in-law and his wifey and something special for my father's upcoming birthday...Will share what I find...
7) Last big item on the short list? My son's 3rd birthday...I think we will keep it small this year - like tiny small...I read somewhere that a nice rule to follow is to invite as many friend's as the child's age...I think we will do just that! He had a huge first birthday party (30+ people I think) and 8 kids for his second party...I think this will be the last year that we can get away with a very small group of friends (and considering I'll be 7+ months pregnant by then momma needs to keep things simple! I will still do a theme of course (I can't help that!) and considering his new found obsession with dinosaurs...a dino party it will be! I'm thinking dino cupcakes in cones using these fondant molds or these which are ready to use to decorate, DIY dino tails & these cute "loot bags" but using dino books and lots of dino balloons of course!! Will definitely share once it all comes together!
Updates coming soon ;)!
I thought if I shared my intentions with the "cyber universe" I'd be more likely to hold myself accountable...so here goes, my short list (items I absolutely want to do before the baby comes from my long aka never ending to do list):
1) Build my son a teepee. Done. Will share pics of the final product this week. Check out inspiration here and here and here as well as the tutorial I followed here.
![]() |
| Teepee inspiration via 6th Street Design School |
2) Find items for the new baby that will fit in the "nook" in our bedroom that he will be sharing with us for the first few months (before joining his big brother in a shared bedroom). Will share challenges of having a second baby in a 2 bedroom home (It's really a 3 bedroom but the hubby works out of the third as a home office full time)...the products that I am soooo glad I found (this compact crib especially!) and finally hopefully in the next month, photos of the finished nursery-nook.
![]() |
| Inspiration to create a nursery "nook" in our master bedroom via These Moments of Mine |
3) Redecorate my son's nursery to make him a special big boy's room before the baby comes...Again, will share all the fun (and practical) items I found to redecorate on a budget!
![]() |
| Fun accents to decorate my son's new big boy room via Gathered Nest Design on Etsy |
4) Finally pick the paint colours and backsplash to refresh our kitchen and home this coming month. Have you ever looked for the perfect grey??? I've found that I'm not the only one feeling a little overwhelmed over what grey to use. Check out these helpful articles here, here and here.
![]() |
| Benjamin Moore Greys via Thrifty Decor Chick |
5) I have many DIY's I'm currently working on. I'm currently making my version of this, this and/or this, and this and hope to try to make this, this and one or two of these! Will update as I complete projects...These are all to decorate my son's rooms or our living space but can all be made to gift to a loved one!
![]() |
| Similar to a garland I'm currently working on sold on Etsy via Lullaby Mobiles |
6) As for gift giving in the immediate future, I need to find a small gift for my brother and his wife's first wedding anniversary, a birthday gift for my godson's 3rd birthday, a housewarming gift for my brother-in-law and his wifey and something special for my father's upcoming birthday...Will share what I find...
![]() |
| 1st wedding anniversary gift idea - Antique white heart throw embroidered with the couples names and wedding date via Things Remembered |
7) Last big item on the short list? My son's 3rd birthday...I think we will keep it small this year - like tiny small...I read somewhere that a nice rule to follow is to invite as many friend's as the child's age...I think we will do just that! He had a huge first birthday party (30+ people I think) and 8 kids for his second party...I think this will be the last year that we can get away with a very small group of friends (and considering I'll be 7+ months pregnant by then momma needs to keep things simple! I will still do a theme of course (I can't help that!) and considering his new found obsession with dinosaurs...a dino party it will be! I'm thinking dino cupcakes in cones using these fondant molds or these which are ready to use to decorate, DIY dino tails & these cute "loot bags" but using dino books and lots of dino balloons of course!! Will definitely share once it all comes together!
![]() |
| DIY dino tail tutorial via Running with Scissors |
Labels:
Birthday party ideas,
DIY gift,
Gift for anniversary,
Loot bags,
Nook,
Nursery Room,
Paint,
Teepee tent
Friday, 29 March 2013
Update to Easter Baskets Modified
What was supposed to be a simple task ended up being a little more complicated than I thought. I usually use cellophane rolls to wrap any basket I make, but this time I was tempted to use basket bags thinking it would be easier. The first one I purchased was too big for the sand bucket and the ones I purchased last night were too "loose" so they didn't hold the package together. I guess they are made for much much bigger baskets. So I went back to my cellophane roll. I wanted clear cellophane so you can see what's inside.
My neighbour however, bought her basket bags from the dollar store and her basket turned out great. I really like that the bunnies on the bag look like they are coming out from inside the package.
Wednesday, 27 March 2013
Easter Baskets Modified
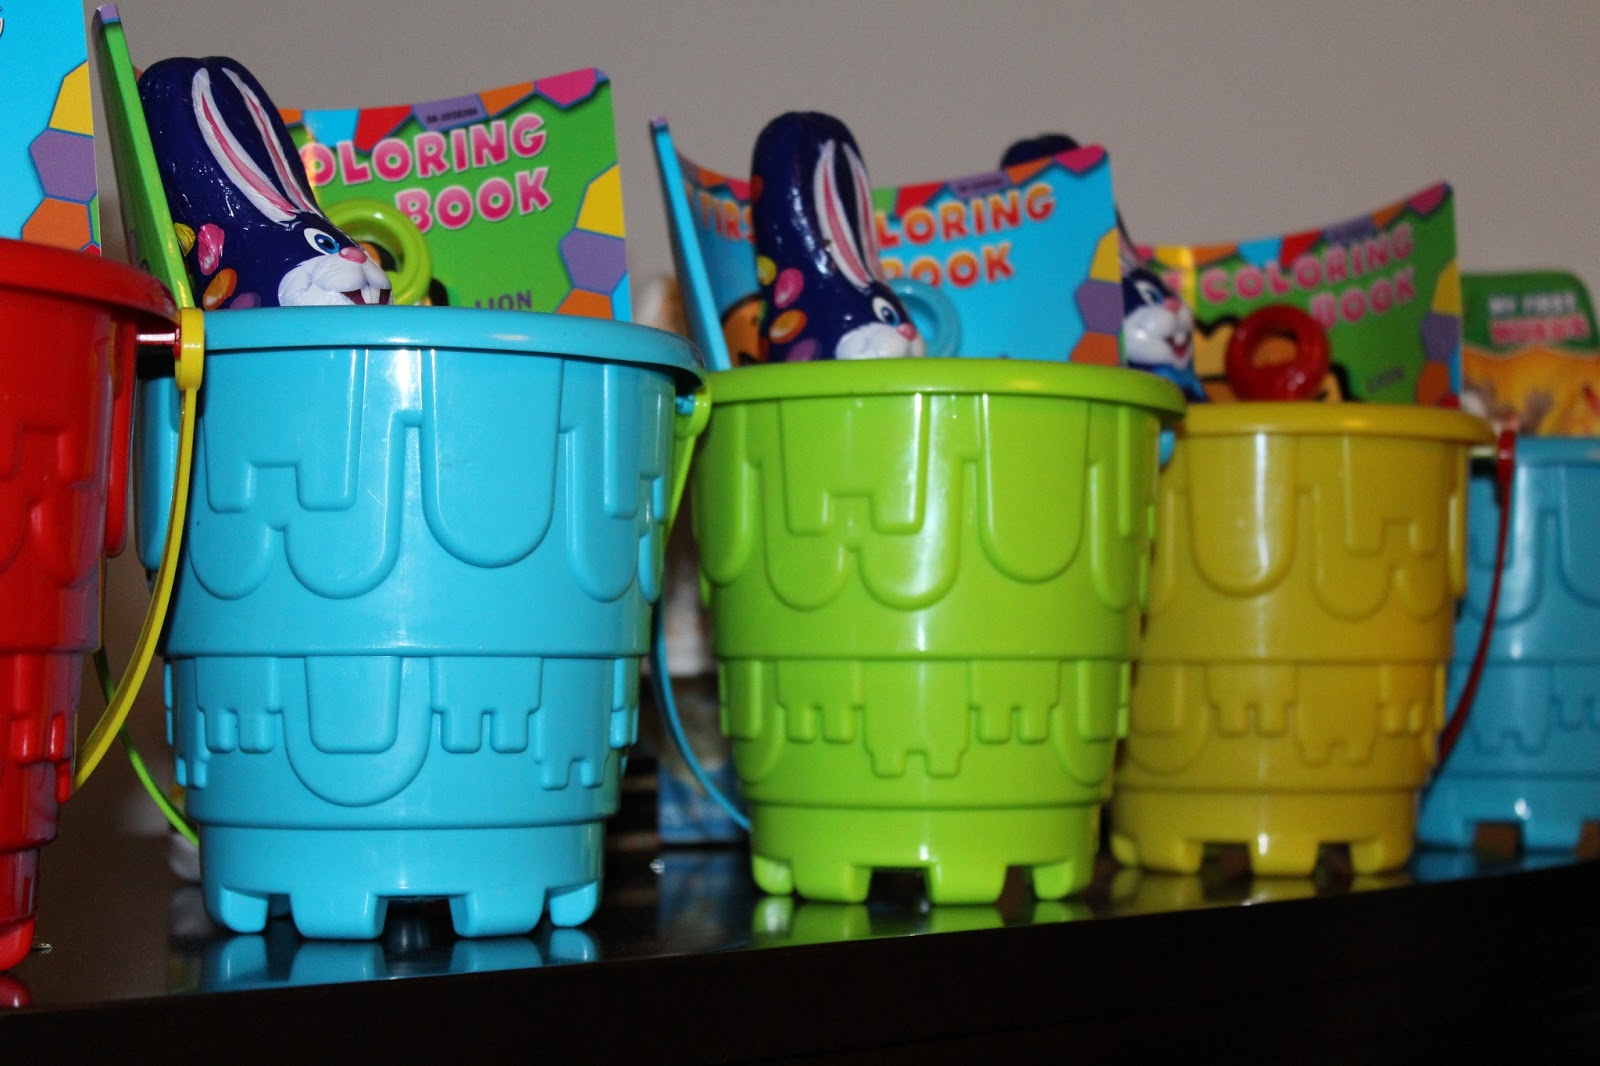
I am trying to keep my Easter "Baskets" for my son's friends functional this year and I had a great time shopping at my local dollar store. I hesitate buying toys at the dollar store but sometimes the finds are just as good as other places! Instead of a basket I got sand buckets that came with one shovel. They came in a variety of colours so I got at least one of each.
Instead of tissue paper to fill the bucket, I went with candy fillable eggs and I filled them with candy. It added colour and I hope the kids will like playing with the eggs just as much as my son does. He loves opening and closing them and filling them with items.
One of my greatest finds were these books. The top ones are colouring books (for the kids ages 18 months and above) and the bottom one is a bathtime book (for the under one year). Why do I love these so much??? It is because the words are in French and English - great for any kid that is learning to speak both languages which is the case with my son and his friends - and because they are sturdy.
I know some parents hate receiving chocolate and too much of it at Easter for their kids so I tried to keep the chocolate and candy the secondary focus of my basket, but I couldn't omit it completely. So I bought these cute looking bunnies filled with smarties - just the right amount of chocolate.
I packaged them all and here is how they looked (as a tip if you are preparing these, make sure you tape your items together and to the bucket so that they don't shift and fall out).
And then I realized I was out of cellophane bags and wraps...so this post unfortunately is to be continued. I am hoping to head out tomorrow to buy some, and to wrap the package in time to post the final result tomorrow night. Please stay tuned!
DIY "healthy" easter treat for the kids
I needed to come up with a treat for my son's daycare friends. I really did not want to give them more chocolates seeing as I'm certain they will be getting plenty during this holiday. I turned to my trusty Pinterest account and found this super cute, easy, inexpensive and somewhat "healthy" (healthier than chocolate in any case) DIY.
![]() |
| Easter DIY treat - source unknown |
I found the cone cellophane wrappers at Walmart and green ribbon at the Dollarstore. Fill each cellophane wrapper with orange coloured fish crackers, tie a knot with the ribbon and add a little card or sticker label with your Happy Easter Wish! SO simple!
![]() |
| Fish shaped cheese crackers |
![]() |
| Cone shaped cellophane wrappers |
![]() |
| Green wavy ribbon via Etsy |
![]() |
| Easter custom label via Etsy |
![]() |
| Easter custom label via Etsy |
![]() |
| Easter custom label via Etsy |
![]() |
| Printable tags via Etsy |
Saturday, 26 January 2013
Another cute DIY idea for kid's Valentines
As I mentioned in yesterday's post I really like the idea of a kid's Valentine that can also be used for fun play even after Valentine's Day has past. How cute are these Valentine Pirate's patches?
A very simple and fun project to prepare with your kids in anticipation for Valentine's day. I have to mention that the kids in this video tutorial are absolutely adorable!
![]() |
| via Daily Candy |
![]() |
| via Daily Candy |
![]() |
| via Daily Candy |
![]() |
| via Daily Candy |
A very simple and fun project to prepare with your kids in anticipation for Valentine's day. I have to mention that the kids in this video tutorial are absolutely adorable!
![]() |
| via Daily Candy |
Subscribe to:
Posts (Atom)


.jpeg)